Category: Mac软件

OCLP 在老旧Mac上遇到 App 崩溃 Namespace SIGNAL, Code 4 Illegal instruction:4 的解决办法

OCLP 是一个允许老旧Mac允许不被支持的系统解决方案,目前,如果你的机器CPU不支持 AVX/AVX2指令集,在更新到 Sequioa 后一些App会崩溃,报错。Namespace SIGNAL, Code 4 Illegal instruction: 4,这是因为 JetEngine.JSStack.scheduler 需要 AVX/AVX2 支持,否则就会报错。

目前越来越多的App会调用 JIT,甚至JavaScriptCore也会调用,这就导致相当多的App无法启动或正常加载,包括 Safari,Music,App Store等,目前的的解决办法是:

  1. 在OCLP 中注入 no AVX/AVX2 kext, 具体名称为
    NoAVXFSCompressionTypeZlib.kext
    NoAVXFSCompressionTypeZlib-AVXpel.kext
  2. 重启机器后在命令行输入一下命令:
    launchctl setenv JSC_useJIT true; launchctl setenv __XPC_JSC_useJIT true
  3. 再次开启会崩溃的App,问题解决。

这个方法仅限目前有效,以后再更新到新的系统,可能会无法禁用 JIT 调用,方法会失效。

这个方法同样适用于老旧 CPU 架构的 X86 用户,通常2012年之前的CPU都不支持AVX/AVX2,具体可以用 MacCPUID 查看。

macOS 15 Sequoia 如何修改 read only 的系统只读文件

随着苹果越来越严格的系统文件权限限制,在 Sequoia 下想要修改 /System 下的文件变得越来越难,现在几乎已经不可能在系统中直接修改。本文将介绍如何在 Recovery 恢复模式下修改系统文件价。

注意:修改系统文件可能会引起系统严重错误,导致系统无法开机、数据顺坏或被木马病毒破坏,在操作之前请清楚的知道你在做什么,否则请停止。

另外,有些地方提到可以在 /etc/synctheri.conf 添加映射来修改系统文件,其实这个是不准确的,synctheri.conf 只能映射目录到 / 根文件夹,是不能修改 /System 下的文件的。

教程开始:

  1. 重启系统,启动系统到 Recovery 模式
  2. 关闭SIP
    在Recovery 模式下打开终端,输入以下命令
    csrutil disable
    OpenCore 用户NVRM 里添新增 7C436110-AB2A-4BBB-A880-FE41995C9F82,然后添加键值 csr-active-config, 类型 Data, 值 67000000
  3. 重启系统,再次进入Recovery Mode
  4. 验证 SIP 是否关闭,打开终端输入命令
    csrutil status
    确认所有SIP保护项均已关闭
  5. 挂载要修改的系统根目录为可读写,终端输入命令:
    mount -uw /Volumes/Macintosh\ HD # 确认你的系统卷名称
    cd /Volumes/Macintosh\ HD
  6. 编辑、修改要改动的系统文件,这里以替换一个Framework文件为例,输入复制命令
    # 备份原始文件(可选)
    cp -R System/Library/PrivateFrameworks/TargetFramework ./TargetFramework.backup
    # 替换文件
    cp -R /path/to/your/Framework System/Library/PrivateFrameworks/
  7. 重建系统快照(关键,没有这一步重启后修改就没了,但是如果你的文件有问题,你的系统可能就会崩溃)
    bless --folder /Volumes/Macintosh\ HD/System/Library/CoreServices --bootefi --create-snapshot
  8. 重启系统,进入系统验证文件是否添加成功。
  9. 验证文件添加成功后,一定一定要记得回到 Recovery 模式关闭SIP,以确保系统安全。
    csrutil enable
  10. 重启,进入正常系统,修改结束。

如果修改 OpenCore 启动选择器的磁盘名称

修改 /System/Volumes/Preboot/uuid/System/Library/CoreServices/.disk_label.contentDetails 文件里的磁盘名称即可。

sudo nano /System/Volumes/Preboot/uuid/System/Library/CoreServices/.disk_label.contentDetails

uuid 替换成你的系统里显示的 uuid 即可。

如果系统SIP不允许的话,先关闭SIP,设置完成后再打开即可。

解决 macOS Sequoia SSH无法连接:kex_exchange_identification: read: Connection reset by peer

从 Sonoma 升级到 Sequoia 遇到过各种各样的SSH连接问题,其中包括但不限于
1. 防火墙问题
2. WiFi 隐私问题
3. 加密协议不匹配问题
4. SSH 版本强制 2.0 的问题

但今天又遇到一个新问题,通过SSH连接报错,提示 kex_exchange_identification: read: Connection reset by peer,看起来连接被中断,通过 Verbose Mode 查看SSH连接提示如下:

$ ssh -v [email protected]
OpenSSH_9.2p1 Debian-2+deb12u5, OpenSSL 3.0.15 3 Sep 2024
debug1: Reading configuration data /etc/ssh/ssh_config
debug1: /etc/ssh/ssh_config line 19: include /etc/ssh/ssh_config.d/*.conf matched no files
debug1: /etc/ssh/ssh_config line 21: Applying options for *
debug1: Connecting to 10.0.1.3 [10.0.1.3] port 22.
debug1: Connection established.
debug1: identity file /home/zhaoxitao/.ssh/id_rsa type -1
debug1: identity file /home/zhaoxitao/.ssh/id_rsa-cert type -1
debug1: identity file /home/zhaoxitao/.ssh/id_ecdsa type -1
debug1: identity file /home/zhaoxitao/.ssh/id_ecdsa-cert type -1
debug1: identity file /home/zhaoxitao/.ssh/id_ecdsa_sk type -1
debug1: identity file /home/zhaoxitao/.ssh/id_ecdsa_sk-cert type -1
debug1: identity file /home/zhaoxitao/.ssh/id_ed25519 type 3
debug1: identity file /home/zhaoxitao/.ssh/id_ed25519-cert type -1
debug1: identity file /home/zhaoxitao/.ssh/id_ed25519_sk type -1
debug1: identity file /home/zhaoxitao/.ssh/id_ed25519_sk-cert type -1
debug1: identity file /home/zhaoxitao/.ssh/id_xmss type -1
debug1: identity file /home/zhaoxitao/.ssh/id_xmss-cert type -1
debug1: identity file /home/zhaoxitao/.ssh/id_dsa type -1
debug1: identity file /home/zhaoxitao/.ssh/id_dsa-cert type -1
debug1: Local version string SSH-2.0-OpenSSH_9.2p1 Debian-2+deb12u5
kex_exchange_identification: read: Connection reset by peer
Connection reset by 10.0.1.3 port 22

通过 debug1: Connection established. 判断连接没有问题,防火墙OK,WiFi 隐私没问题。但是SSH客户端没有匹配到任何一种加密模式,开始排查加密问题,于是在 /etc/ssh/sshd_config.d/100-macos.conf 里增加了更宽泛的加密协议:

Read more

Netatalk —— 老Mac伴侣,组建AppleTalk网络

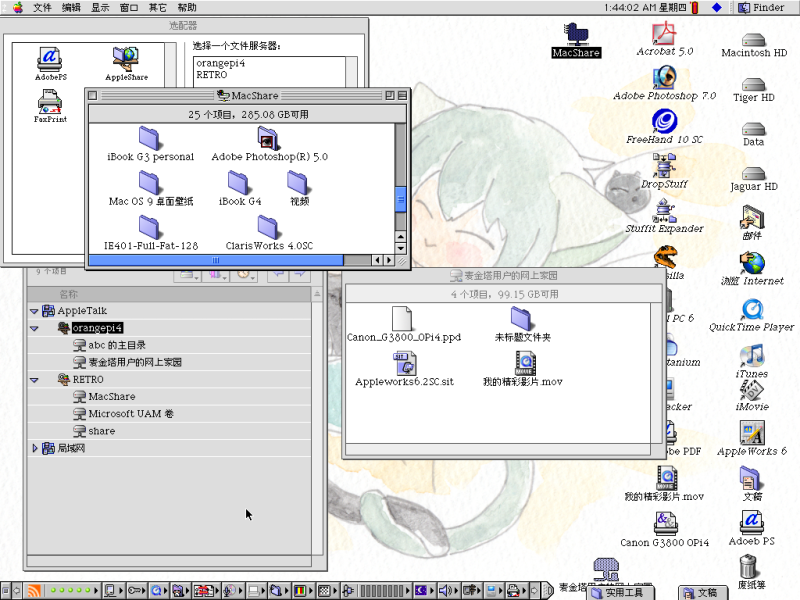
iBook G3连接局域网中的两台AppleTalk服务器,一台使用Netatalk,另一台使用Windows Server 2003

Netatalk是开源的AFP和AppleTalk文件共享服务器软件,可以在Unix和类Unix系统中运行。OpenWrt路由器甚至都可以部署Netatalk。

Netatalk有v2和v3两个大版本,对AFP支持的协议也不同。v2支持AppleTalk(包括时间服务器和打印服务器),AFP协议从1.1版支持到3.3版,可以支持Apple II、Mac System 6到Mac OS 9,也支持Mac OS X。 v3 不支持AppleTalk,但支持AFP 3.4协议,支持Spotlight索引,客户端至少需要System 7.5。Netatalk如果在Mac OS X中运行,那将不支持AppleTalk网络的搭建。

因此要搭建AppleTalk网络,还需要选择Netatalk v2版本,主要用于文件和打印机共享。服务器硬件是OrangePi 4,RK3399开发板,运行Armbian(Jammy Jellyfish版)。Netatalk v2版本选用2.3.1版本,非git版本。 Debian和Ubuntu源里的Netatalk已经是v3版本了,因此需要手动编译安装v2版本。编译安装教程可以参考Netatalk wiki:

Installing Netatalk 2 on Debian​netatalk.io/docs/Installing-Netatalk-2-on-Debian

安装

这里简要说一下步骤:

先安装编译工具和基本依赖:

sudo apt install build-essential libssl-dev libdb-dev autotools-dev automake libtool libtool-bin pkg-config libcups2-dev cups libavahi-client-dev libgcrypt20-dev tcpd libcrack2-dev libacl1-dev libldap2-dev quota libtirpc-dev

下载v2.3.1版本,解压

tar xf netatalk-2.3.1.tar.xz
cd netatalk-2.3.1

编译,安装需要root权限

./configure --enable-systemd --sysconfdir=/etc --with-uams-path=/usr/lib/netatalk
make
sudo make install
Read more

如何彻底关闭 macOS Server 中的 Apache 服务,释放80 443端口

通常情况下,如果你想关闭 macOS 上的 Apache 服务,你只需要输入一下任意一个命令即可:

launchctl unload -w /System/Library/LaunchDaemons/org.apache.httpd.plist

apachectl stop

apachectl -k stop

但是,如果你在Mac上安装了 macOS Server,那么你将无法简单的关闭 Apache 服务。即使你输入以上命令,你会发现80和443端口依然被 Apache 占用,且打开网页会显示如本文开头的图片。“网站已关闭。管理员可以使用 Server 应用程序来打开这些网站。”

如果要彻底关闭 macOS Server 提供的 Apache 服务,你应该输入以下命令:

sudo launchctl unload -w /Applications/Server.app/Contents/ServerRoot/System/Library/LaunchDaemons/com.apple.serviceproxy.plist

解决 Windows 访问 macos Server 文件共享时 OD 密码验证失败的问题

原文出处:https://discussions.apple.com/thread/5483728?start=0&tstart=0

问题情况:

Open Directory 密码服务报错:

DoAuth: {0xd666eb1e840a11e78d78320019de5b40, %username%} SMB-NTLMv2 authentication failed, SASL error -13 (password incorrect).

解决办法:

On command line….

1. Enter “gpedit.msc” in the Start Search box.
2. Open “Computer Configuration”/Windows Settings/Security Settings/Local Policies/Security Settings.
3. In the right pane, enable the following policies:

Network access: Allow anonymous SID/name translation
Network access: Let Everyone permissions apply to anonymous users

Also please disable the following policies.

Network access: Restrict anonymous access to Named Pipes and Shares
Network access: Do not allow anonymous enumeration of SAM accounts
Network access: Do not allow anonymous enumeration of SAM accounts and shares

Change the following policy:

Network security: LAN Manager authentication level

Change the value to “Send LM & NTLM – use NTLMv2 session security if negotiated”.

P.S: 如果不行就设置为“仅发送 NTLMv2 响应”。这样的话可能导致 Windows 不能访问其他 Windows 电脑的共享。
Read more

网络普通用户群体 IPv6 常见问题解答

文章转载至 ICANN

本 FAQ(常见问题解答)由网络普通用户群体成员为 2009 年 3 月的网络普通用户峰会编写。

A. 基本问题

A1. IPv6 是什么?
A2. 为什么需要引入 IPv6?
A3. IPv6 地址的格式和语法是什么?
A4. IPv4 和 IPv6 可以并存吗?

B. 用户角度 - 访问

B1. 如何在 Windows XP 上启用 IPv6? 
B2. 如何在 Vista 上启用 IPv6?
B3. 如何在 Mac 上启用 IPv6?
B4. 如何在其他操作系统上启用 IPv6?
B5. 如何使用 IPv6 来访问互联网?
a. 纯粹 IPv6
b. 使用隧道技术穿越 IPv4 进行 IPv6 连接 (Teredo、6to4、6in4 等)
– Windows:Teredo 隧道技术
– Mac OS X:Teredo 隧道技术
– Mac OS X:6to4 隧道技术
– 其他操作系统:6to4 和 6in4 隧道技术
c. 特例:移动设备(PDA 等)

C. 焦点问题

C1. IPv6 会带来新的安全漏洞吗?
C2. IPv6 比 IPv4 更快还是更慢?
C3. IPv6 有什么 IPv4 不具备的功能吗?
C4. IPv4 将来会被关闭吗?
C5. 哪些硬件设备(ADSL 调制解调器等)能与 IPv6 兼容?
C6. 哪些 ISP(互联网服务提供商)会提供 IPv6 服务?
C7. 我很好奇,为什么不提 IPv5?
C8. 哪里可以找到关于 IPv6 的更多信息?

Read more

Mac 终端命令代理工具

这篇文章已不再适用,因为找到了更好的透明代理叫Proxifier。

官网地址:https://www.proxifier.com/

注册码:P427L-9Y552-5433E-8DSR3-58Z68

————-以下是废物—————————

公司网络服务器是一台 Mac mini Server(坑是自己挖的),然后最近要做一个透明网关代理用于公(ke)司(xue)业(shang)务(wang),然后研究 pfctl 研究到快疯了,这破玩意儿太 TMD 不友好了,而且在研究了一天后发现这货根本无法实现透明代理~~~

然后就各种心灰意冷之后突然看到一片曙光,原来有一个叫 ProxyChains 的神器。。。

好了,就是这里:https://github.com/rofl0r/proxychains-ng

安装 Mac

brew install proxychains-ng

配置文件

vim /usr/local/etc/proxychains.conf

OSX 上 pfctl 的简单配置笔记

OS X 上没有iptables,在10.10以后以pf取代ipfw。相比于iptables,pf一般使用配置文件保存防火墙规则,语法规范上更严谨,但是配置也更复杂、规则冗长。本文记录pf的简单配置方法。

cat /etc/pf.conf,可看到以下已有内容:(忽略注释部分)

scrub-anchor "com.apple/*"
nat-anchor "com.apple/*"
rdr-anchor "com.apple/*"
dummynet-anchor "com.apple/*"
anchor "com.apple/*"
load anchor "com.apple" from "/etc/pf.anchors/com.apple"

anchor可理解为一组规则的集合。默认情况下,这里的几行anchor都是苹果留的place holder,实际上没有active的规则。
/etc/pf.conf在以后的OSX更新中可能会被覆盖,最好可以另外建立一个自定义的pf.conf。
配置文件必须按照Macros, Tables, Options, Traffic Normalization, Queueing, Translation, Packet Filtering的顺序。
更详细的说明参考pf.conf man page
添加一个anchor。修改/etc/pf.conf如下:

scrub-anchor "com.apple/*"
nat-anchor "com.apple/*"
nat-anchor "custom"
rdr-anchor "com.apple/*"
rdr-anchor "custom"
dummynet-anchor "com.apple/*"
anchor "com.apple/*"
anchor "custom"
load anchor "com.apple" from "/etc/pf.anchors/com.apple"
load anchor "custom" from "/etc/pf.anchors/custom"

建立anchor规则文件/etc/pf.anchors/custom,内容为具体规则。
常用的规则:

屏蔽IP入站TCP连接并记录:

block in log proto tcp from 192.168.1.136 to any

转发入站TCP连接到另一本地端口:

rdr inet proto tcp from any to any port 8081 -> 127.0.0.1 port 80

经测试,rdr无法转发到另一台外部主机上(man page的示例,只可以转发到internal network),内核开启net.inet.ip.forwarding=1也无效。如需转发到另一个外网IP,需要配合mitmproxy的透明代理

NAT,路由vlan12接口上(192.168.168.0/24)的出口包,经由非vlan12的接口转换到外部地址(204.92.77.111),并允许vlan12之间的互相访问:

nat on ! vlan12 from 192.168.168.0/24 to any -> 204.92.77.111

使配置文件生效

pfctl -evf /etc/pf.conf

原文地址:https://blog.chionlab.moe/2016/02/01/use-pf-on-osx/

ABOUT

老赵的个人博客,关于 Mac, iPhone, iPad, iPod等产品的软件和硬件技术交流。也讨论Linux/UNIX技术,服务器运维技术等。

2025 年 5 月
 123
45678910
11121314151617
18192021222324
25262728293031

Powerd by WordPress on Xserve
Xserve 2009
@2012-2024 HelloMac Copyright