Author: 赵 汐桃

解决 macOS Sequoia 奇怪的SSH链接问题:kex_exchange_identification: read: Connection reset by peer

从 Sonoma 升级到 Sequoia 遇到过各种各样的SSH连接问题,其中包括但不限于
1. 防火墙问题
2. WiFi 隐私问题
3. 加密协议不匹配问题
4. SSH 版本强制 2.0 的问题

但今天又遇到一个新问题,通过SSH连接报错,提示 kex_exchange_identification: read: Connection reset by peer,看起来连接被中断,通过 Verbose Mode 查看SSH连接提示如下:

$ ssh -v [email protected]
OpenSSH_9.2p1 Debian-2+deb12u5, OpenSSL 3.0.15 3 Sep 2024
debug1: Reading configuration data /etc/ssh/ssh_config
debug1: /etc/ssh/ssh_config line 19: include /etc/ssh/ssh_config.d/*.conf matched no files
debug1: /etc/ssh/ssh_config line 21: Applying options for *
debug1: Connecting to 10.0.1.3 [10.0.1.3] port 22.
debug1: Connection established.
debug1: identity file /home/zhaoxitao/.ssh/id_rsa type -1
debug1: identity file /home/zhaoxitao/.ssh/id_rsa-cert type -1
debug1: identity file /home/zhaoxitao/.ssh/id_ecdsa type -1
debug1: identity file /home/zhaoxitao/.ssh/id_ecdsa-cert type -1
debug1: identity file /home/zhaoxitao/.ssh/id_ecdsa_sk type -1
debug1: identity file /home/zhaoxitao/.ssh/id_ecdsa_sk-cert type -1
debug1: identity file /home/zhaoxitao/.ssh/id_ed25519 type 3
debug1: identity file /home/zhaoxitao/.ssh/id_ed25519-cert type -1
debug1: identity file /home/zhaoxitao/.ssh/id_ed25519_sk type -1
debug1: identity file /home/zhaoxitao/.ssh/id_ed25519_sk-cert type -1
debug1: identity file /home/zhaoxitao/.ssh/id_xmss type -1
debug1: identity file /home/zhaoxitao/.ssh/id_xmss-cert type -1
debug1: identity file /home/zhaoxitao/.ssh/id_dsa type -1
debug1: identity file /home/zhaoxitao/.ssh/id_dsa-cert type -1
debug1: Local version string SSH-2.0-OpenSSH_9.2p1 Debian-2+deb12u5
kex_exchange_identification: read: Connection reset by peer
Connection reset by 10.0.1.3 port 22

通过 debug1: Connection established. 判断连接没有问题,防火墙OK,WiFi 隐私没问题。但是SSH客户端没有匹配到任何一种加密模式,开始排查加密问题,于是在 /etc/ssh/sshd_config.d/100-macos.conf 里增加了更宽泛的加密协议:

Read more

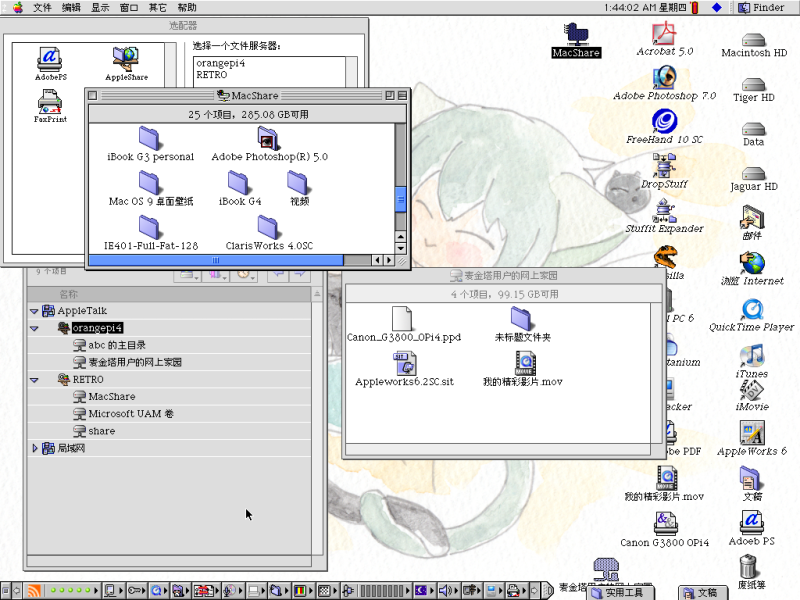
Netatalk —— 老Mac伴侣,组建AppleTalk网络

iBook G3连接局域网中的两台AppleTalk服务器,一台使用Netatalk,另一台使用Windows Server 2003

Netatalk是开源的AFP和AppleTalk文件共享服务器软件,可以在Unix和类Unix系统中运行。OpenWrt路由器甚至都可以部署Netatalk。

Netatalk有v2和v3两个大版本,对AFP支持的协议也不同。v2支持AppleTalk(包括时间服务器和打印服务器),AFP协议从1.1版支持到3.3版,可以支持Apple II、Mac System 6到Mac OS 9,也支持Mac OS X。 v3 不支持AppleTalk,但支持AFP 3.4协议,支持Spotlight索引,客户端至少需要System 7.5。Netatalk如果在Mac OS X中运行,那将不支持AppleTalk网络的搭建。

因此要搭建AppleTalk网络,还需要选择Netatalk v2版本,主要用于文件和打印机共享。服务器硬件是OrangePi 4,RK3399开发板,运行Armbian(Jammy Jellyfish版)。Netatalk v2版本选用2.3.1版本,非git版本。 Debian和Ubuntu源里的Netatalk已经是v3版本了,因此需要手动编译安装v2版本。编译安装教程可以参考Netatalk wiki:

Installing Netatalk 2 on Debian​netatalk.io/docs/Installing-Netatalk-2-on-Debian

安装

这里简要说一下步骤:

先安装编译工具和基本依赖:

sudo apt install build-essential libssl-dev libdb-dev autotools-dev automake libtool libtool-bin pkg-config libcups2-dev cups libavahi-client-dev libgcrypt20-dev tcpd libcrack2-dev libacl1-dev libldap2-dev quota libtirpc-dev

下载v2.3.1版本,解压

tar xf netatalk-2.3.1.tar.xz
cd netatalk-2.3.1

编译,安装需要root权限

./configure --enable-systemd --sysconfdir=/etc --with-uams-path=/usr/lib/netatalk
make
sudo make install
Read more

解决apt-get安装中的E: Sub-process /usr/bin/dpkg returned an error code (1)问题

 今天在用apt-get命令更新软件包的时候遇到找不到 apt-listchanges 的问题,用dpkg尝试修复报错 E: Sub-process /usr/bin/dpkg returned an error code (1)问题,尝试多种办法都无法解决,包括用apt强制卸载apt-listchanges,用dpkg尝试卸载apt-listchanges都无法解决,最后找到以下办法:

cd /var/lib/dpkg/
sudo mv info/ info_bak # 现将info文件夹更名
sudo mkdir info # 再新建一个新的info文件夹
sudo apt-get update # 更新
sudo apt-get -f install # 修复
sudo mv info/* info_bak/ # 执行完上一步操作后会在新的info文件夹下生成一些文件,现将这些文件全部移到info_bak文件夹下
sudo rm -rf info # 把自己新建的info文件夹删掉
sudo mv info_bak info # 把以前的info文件夹重新改回名

最后问题解决。

原文地址:https://www.cnblogs.com/bymo/p/9046586.html

如何彻底关闭 macOS Server 中的 Apache 服务,释放80 443端口

通常情况下,如果你想关闭 macOS 上的 Apache 服务,你只需要输入一下任意一个命令即可:

launchctl unload -w /System/Library/LaunchDaemons/org.apache.httpd.plist

apachectl stop

apachectl -k stop

但是,如果你在Mac上安装了 macOS Server,那么你将无法简单的关闭 Apache 服务。即使你输入以上命令,你会发现80和443端口依然被 Apache 占用,且打开网页会显示如本文开头的图片。“网站已关闭。管理员可以使用 Server 应用程序来打开这些网站。”

如果要彻底关闭 macOS Server 提供的 Apache 服务,你应该输入以下命令:

sudo launchctl unload -w /Applications/Server.app/Contents/ServerRoot/System/Library/LaunchDaemons/com.apple.serviceproxy.plist

Ngrok 搭建指南

文章转载至 Luozm’s Blog

ngrok是一个反向代理,它能够让你本地的web服务或tcp服务通过公共的端口和外部建立一个安全的通道,使得外网可以访问本地的计算机服务。ngrok1.x开源,ngrok2.x不开源。

ngrok

Ngrok的主要用途有以下几种:

  • 内网穿透,可代替vpn
  • 将无外网IP的desktop映射到公网
  • 临时搭建网络并分配二级域名
  • 微信二次开发的本地调试

自己搭建ngrok服务需要一台外网服务器,一个域名(如果只用来内网穿透好像也可以不要?)。本文中使用的服务器系统为Ubuntu 16.04。

Read more

CentOS6.4 搭建 LNMP+Postfix+Dovecot+Postfixadmin+Roundcubemail 企业邮件环境

1.先下载安装软件包并搭建好 LNMP 环境(略)

2.编译安装postfix-2.9.3。
2.1创建postfix用户和组,且指定GID最好为大于1000的数值。
# groupadd -g 2525 postfix
# useradd -g postfix -u 2525 -s /sbin/nologin -M postfix
# groupadd -g 2526 postdrop
# useradd -g postdrop -u 2526 -s /sbin/nologin -M postdrop

2.2 编译安装postfix

Read more

使用 Git 命令管理 GitHub 已存在的项目

网上有很多使用 Git 与 GitHub 同步的教学文章,但是大多是都是从 init 一个项目开始,这篇文章主要是主导如何管理一个已经在 GitHub 上存在的项目,比如你直接在 GitHub 上 focked 了一个别人的项目,你克隆到本地然后再提交去 GitHub。

1、设置 GitHub SSH 访问密钥
本地生成指纹文件:
ssh-keygen -t rsa -C "[email protected]"
会提示你选择保存文件的路径和密码,路径可以默认,密码可以直接回车留空
默认会在你的 .ssh 文件夹下生成密码文件

复制生成的 pub 文件内容粘贴到你的 GitHub 账户设置的 SSH Key 中:
cat /home/builder/.ssh/id_rsa.pub Read more

解决 Windows 访问 macos Server 文件共享时 OD 密码验证失败的问题

原文出处:https://discussions.apple.com/thread/5483728?start=0&tstart=0

问题情况:

Open Directory 密码服务报错:

DoAuth: {0xd666eb1e840a11e78d78320019de5b40, %username%} SMB-NTLMv2 authentication failed, SASL error -13 (password incorrect).

解决办法:

On command line….

1. Enter “gpedit.msc” in the Start Search box.
2. Open “Computer Configuration”/Windows Settings/Security Settings/Local Policies/Security Settings.
3. In the right pane, enable the following policies:

Network access: Allow anonymous SID/name translation
Network access: Let Everyone permissions apply to anonymous users

Also please disable the following policies.

Network access: Restrict anonymous access to Named Pipes and Shares
Network access: Do not allow anonymous enumeration of SAM accounts
Network access: Do not allow anonymous enumeration of SAM accounts and shares

Change the following policy:

Network security: LAN Manager authentication level

Change the value to “Send LM & NTLM – use NTLMv2 session security if negotiated”.

P.S: 如果不行就设置为“仅发送 NTLMv2 响应”。这样的话可能导致 Windows 不能访问其他 Windows 电脑的共享。
Read more

Netgear WNR2000 无线路由器 LAN 口变 WAN 口

文章出处:http://blog.sina.com.cn/s/blog_5f880b9b0100gdwn.html

最近一两天家里的无线路由速度突然变得极不稳定,时快时慢。开始以为是方正宽带的问题,后来打电话给方正,说他们那里是正常的。于是怀疑是无线路由的问题。

把路由器拿出来看了一下,没发现异常,再重新连上网线,问题出现,不能上网了。症状是:无线连接正常,ping路由器的局域网地址正常,ping路由器的wan口地址正常,ping上级交换机地址不通。怀疑是外网网线问题,但把网线直接接到电脑上又一切正常。

于是怀疑是路由器的端口坏了。仔细观察路由器上的网线接口,发现wan口的8个簧片中有一个有些塌陷,估计会跟网线水晶头不能很好接触,导致接触不良。

先用针挑了一下塌陷的簧片,发现不能使其完全复原。这样情况下,即使勉强能用,接触肯定还是会有问题,不知道什么时候就又坏了。还是换个思路吧。一是换一个wan口接头,这需要去买一个接口,还得把原来的焊下来,把新的焊上去,我自己肯定没有这个手艺,要跑电脑城,麻烦。二是借用一下剩下4个好用的lan口中的一个来做wan口,这个好吧,只要改一下路由器固件设置就ok了。
我的路由装的是dd-wrt mini版,google如何把lan口变wan口,几乎没有,把wan口变lan口,把路由器变成一个5口交换机的教程倒是挺多,貌似也很简单,把wan口跟lan口设置到一个vlan中就行了,http://cisco.chinaitlab.com/configure/783022.html
Read more

ABOUT

老赵的个人博客,关于 Mac, iPhone, iPad, iPod等产品的软件和硬件技术交流。也讨论Linux/UNIX技术,服务器运维技术等。

2025 年 4 月
 12345
6789101112
13141516171819
20212223242526
27282930  

Powerd by WordPress on Xserve
Xserve 2009
@2012-2024 HelloMac Copyright